Using the RDM JDBC Driver on Android
This section describes how to use the RDM JDBC driver for Android.
Having downloaded the RDM Android package, you can now use it with your project. You can do this using Eclipse and the ADT plug-in, which you can get from here:
http://developer.android.com/sdk/eclipse-adt.html
With the steps above completed you should be able to begin developing applications using the RDM Database on Android.
The following steps will demonstrate using the RDM JDBC driver for Android with a simple example.
Eclipse + ADT plug-in
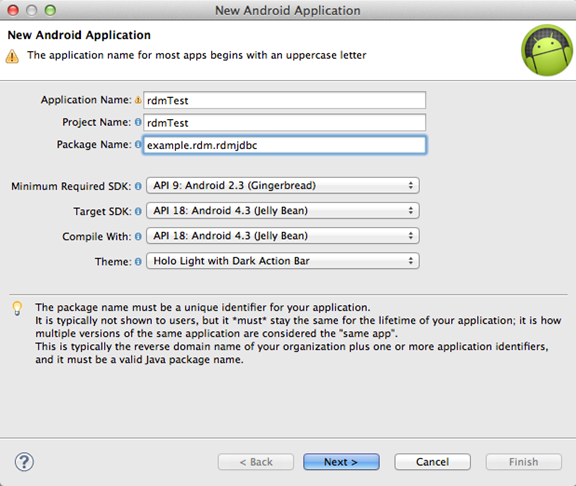
- Create a workspace inside the Eclipse IDE.
- Create a Android Application Project using:
rdmTestas the project name.- Use
example.rdm.rdmjdbcas the package name - Using API 18 as the Target SDK (note – minimum required SDK for the RDM JDBC driver is API 10: Android 2.3.3 (Gingerbread)
- The wizard generates a blank Activity, then just copy and past the following example code into that file
package example.rdm.rdmjdbc;

import java.sql.*;

import android.app.Activity;
import android.os.Bundle;
import android.util.Log;
import android.view.Menu;

public class RDM_TestActivity extends Activity {

	private static final String TAG = "RDMTest";

	@Override
	protected void onCreate(Bundle savedInstanceState) {
		super.onCreate(savedInstanceState);
		setContentView(R.layout.activity_rdm__test);

		Log.v(TAG, "Test: RDM JDBC driver for Android");

		Connection conn;
		Statement stmt;
		ResultSet rs;

		String dbUrl = "jdbc:raima:rdm://local?appname=example.rdm.rdmjdbc";

		try {
			Class.forName("com.raima.rdm.jdbc.RDMDriver");
		} catch (ClassNotFoundException cfe)
		{
			Log.v(TAG, cfe.getMessage());
		}

		try {
			conn = DriverManager.getConnection(dbUrl);
			conn.setAutoCommit(false);
			stmt = conn.createStatement();
			stmt.executeUpdate("DROP DATABASE IF EXISTS CONTACTS");
			stmt.executeUpdate("CREATE DATABASE CONTACTS");
			stmt.executeUpdate("CREATE TABLE PERSON (" +
							   "    PERSONID int, " +
					           "     LASTNAME  varchar(255), " +
							   "     FIRSTNAME varchar(255), " +
					           "     ADDRESS   varchar(255), " +
					           "     CITY      varchar(255));");
			conn.commit();
			stmt.close();
			stmt = conn.createStatement();
			stmt.execute("INSERT INTO PERSON " +
						 "values(1, 'SMITH', 'JOE', '101 Main Street', 'Mayberry')");
			stmt.execute("INSERT INTO PERSON " +
						 "values(2, 'SMITH', 'JANE', '101 Main Street', 'Mayberry')");
			conn.commit();
			rs = stmt.executeQuery("SELECT FIRSTNAME, LASTNAME from PERSON");
			while (rs.next()) {
				Log.v(TAG, rs.getString(1) + " " + rs.getString(2));
			}
			rs.close();
			stmt.close();
			conn.close();
		} catch (SQLException e) {
			// TODO Auto-generated catch block
			Log.v(TAG, e.getMessage());
		}
	}

	@Override
	public boolean onCreateOptionsMenu(Menu menu) {
		// Inflate the menu; this adds items to the action bar if it is present.
		getMenuInflater().inflate(R.menu.rdm__test, menu);
		return true;
	}

}
- Copy the following files into the project workspace directory libs/armeabi
librdmbase-14.solibrdmddl-14.solibrdmenc-14.solibrdmha-14.solibrdmhttp-14.solibjdbcjni-14.solibrdmpsp-14.solibrdmrdm-14.solibrdmrsql-14.solibrdmsbase-14.solibrdmtfs-14.solibrdmtransport-14.solibrdmxml-14.so
- Copy
rdmjdbc-14.jarinto the project workspace directory libs - Convert the
rdmjdbc-14.jarto the Android Dalvik format- From Project Properties
- Choose Build Path => Configure Build Path
- Select the Libraries tab
- Click on Add JARs, and select the
rdmjdbc-14.jarin the libs directory.

- Run the Project via Run As -> Android Application
- This simple example app captures database query results to the Android log, so verify this simple test with the Android adb view in Eclipse.
