Embedded C Application (vxWorks/Windows Host)
Introduction
Now that you've gotten comfortable with creating a database in the How to Create a Schema section, lets build an application that will allow you to read and write to a database.
We recommend getting familiar with some of the concepts and tools that you will be using in this tutorial. We will be covering: interacting with the Transaction File Server (TFS), inserting a row with the function call rdm_dbInsertRow(), and reading rows with the function call rdm_cursorReadRow(). You may also find it useful to read about the DOCROOT as well.
- The TFS is responsible for safely storing and retrieving objects. It is like a key/value store, but very fast and transactionally safe. The TFS owns and is co-located with the database files.
- In this example
rdm_dbInsertRow()will be used to insert a new row into two of our tables:AUTHORandBOOK. rdm_cursorReadRow()reads all columns from a row specified by theRDM_CURSORand places the contents inside of the designated buffer.- The DOCROOT is a directory which is designated for holding databases available to a Transaction File Server (TFS). The concept is similar to a web server document root for storing web pages
Prerequisites:
- Create
bookStoreDatabaserdm-create - Have
bookStore_structs.hheader file createdrdm-compile
- Program source created during How to Create an Embedded C Application session. (The source for the program can be found here: bookStore_embed.c)
Steps:
- Change directories into
C:\Raima\RDM\15.1\target\vxworks7-x86_64_core - Start the Wind River environment shell:
- In the wrenv shell, execute the setup of the vxWorks Source Build (VSB) for the target you will be using:
- Start the Wind River Workbench 4 tool.
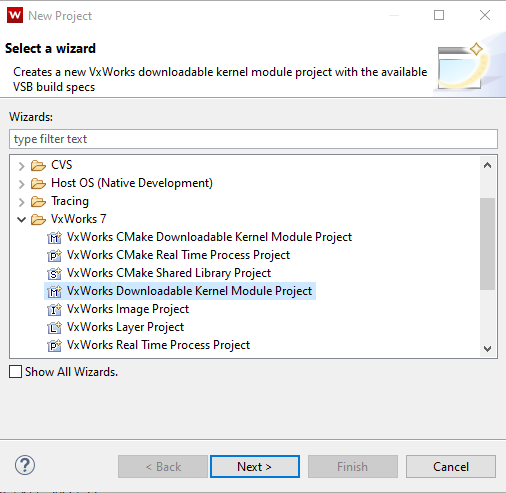
- Right click inside of the Project Explorer tab and click Create New Project
- Under the VxWorks7 folder, choose VxWorks Downloadable Kernel Module Project (DKM)
- Name the project bookStore and press Next
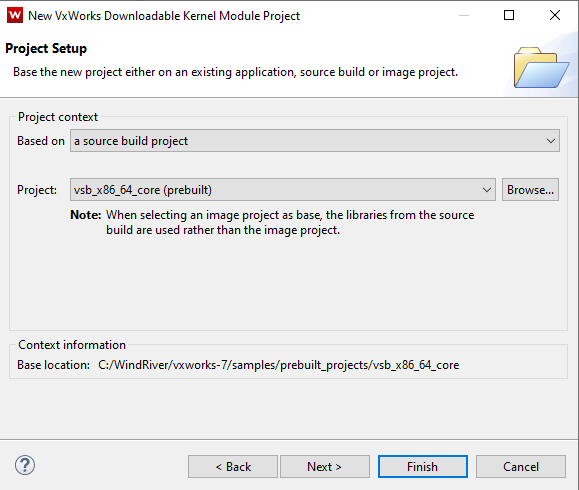
- In the Project dropdown menu, choose vsb_x86_64_core(prebuilt) and press Finish
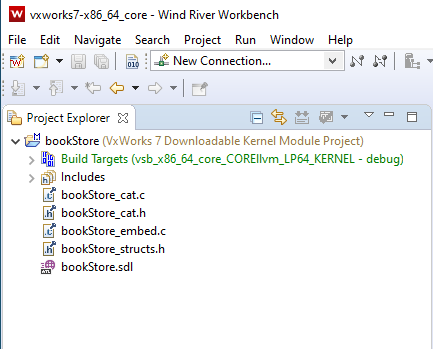
- Outside the Workbench IDE, copy the bookStore_embed.c and bookStore.sdl file created in the How to Create an Embedded C Application session into the
bookStoredirectory in the workspace. - In a command shell, create the
bookStoreschema headers and database catalog files we will need to include in thebookStoreapplication: - In the Workbench environment, refresh the screen and you will see the newly added files (delete the dkm.c file automatically added by the creation of the DKM project).
- Make the following modifications to the
bookStore_embed.cfile.- Add new include files at top:
#include "bookStore_structs.h" #include "bookStore_cat.h" #include "rdmstartuptypes.h"
- Change name of
mainfunction tomain_bookStore - Add the following line at end of the file:
- Prior to the
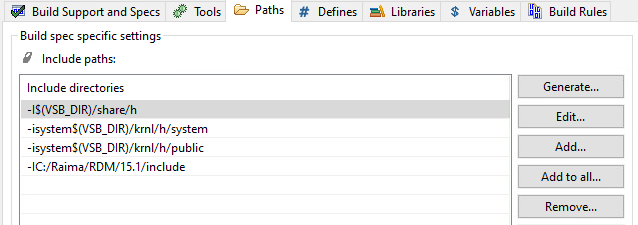
rdm_dbOpenfunction call in thebookStore_mainfunction, insert the following function call to associate the compiled schema reference with the database handle. - Right click on your project folder and click on Properties
- Navigate to the Paths tab
- Click the Add button to the right of the screen and add the include folder from Raima
C:\Raima\RDM\15.1\include - Next, navigate to the Libraries tab and click Add
- Choose the Add library search path (-L) radio button option and find the path
C:\Raima\RDM\15.1\target/vxwors7-x86_64_core/lib - Remaining under the Libraries tab, click Add and choose the Add library file (-l) radio button
- Type in rdmtfs and press OK
- Repeat step 18 and 19 replacing rdmtfs_embed with the following libraries:
- The
bookStoreproject is ready to be built!
The target directory (vxworks7-x86_core) may be different depending on the package you have installed. Change in to the corresponding directory for the package you have installed. For example: vxworks7-x86_32_core or vxworks7-armv7)
$> C:\WindRiver\wrenv -p vxworks-7
$> sh setup.sh --vsb
This setup script may take a while. It only needs to be done once as it will install the new VSB in your Wind River installation.
This rest of this example will be using the target directory above as the Workbench workspace. You may use any workspace location.
Again, the name of source build project to use will be the one with name corresponding to the package you have installed. See Step 1 above.
$> cd C:\Raima\RDM\15.1\target\vxworks7-x86_64_core
$> rdm-compile --c-structs --catalog bookStore.sdl
The files created by rdm-compile will be: bookStore_structs.h, bookStore_cat.h and bookStore_cat.c.
int main_bookStore (int argc, const char* const* argv)
RDM_STARTUP_EXAMPLE(bookStore)
            rc = rdm_dbSetCatalog(db, bookStore_cat);
            rc = rdm_dbOpen(db, "bookStore", RDM_OPEN_SHARED);
Referencing the compiled database catalog in the application allows the database to be created if it does not exist on open. This replaces the need to use the rdm-create utility to create a new database.
The lib directory will be in the target name directory. (See Step 1).
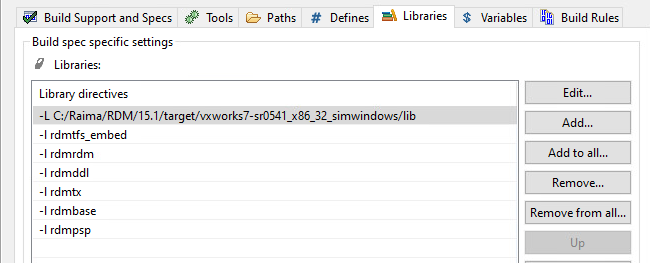
rdmrdm
rdmddl
rdmtransport
rdmtx
rdmhttp
rdmbase
rdmpsp
Not all of the above libraries may be needed for your application. For each of the Raima RDM function calls used, you will need to consult the reference manual to see which library must be added. Also, you will need to add dependent libraries to this list as well. The dependencies are documented in the RDM Libraries section.
Conclusion
Your program should be fully functional at this point. You set up an Embedded TFS which is used when you are interacting with a database that is not shared with other processes, and you wrote and read rows from the database by interacting with the TFS.
Next, you might want to add some more functionality by deleting a row with rdm_cursorDeleteRow() or update a row with rdm_cursorUpdateRow(). Some other concepts to look over might be:
The full source file can be found here: learn/bookStore_embed.c