Android Native C/C++ Application Example
This quick guide explains how to call the RaimaDB runtime API directly within a native (C/C++) JNI module in an Android application by creating a native C/C++ Android application called "Hello from Raima!"
Upon completion, the application will read the "Hello from Raima!" text from a text file, insert it into a database, retrieve it from the database, and display it on the screen, all using the RaimaDB API functions.
Prerequisites
It is assumed that you have completed the following steps before proceeding with this guide.
Create a new Native C/C++ Android Studio project named MyNativeApplication
Add the RaimaDB native libraries for the appropriate architecture to the project. For this guide, X86_64 will be used.
Modify the UI elements of the application
We need to do a few things to the application's UI elements before adding the RaimaDB API to a native JNI module.
Add necessary permissions
Let's start with a simple task. RaimaDB uses TCP sockets for network communication. It is true even when only local connections are used. For this reason, the following elements must be added to the project's AndroidManifest.xml.
<uses-permission android:name="android.permission.INTERNET">
</uses-permission>
<uses-permission android:name="android.permission.ACCESS_NETWORK_STATE">
</uses-permission>
Modify the TextView widget
The application displays "Hello World!" on the main screen by default. The widget called TextView is responsible for that operation. We will remove the initial text from the widget so the screen will initially be blank. We will also increase the font size of the text.
Make the following changes to your project's activity_main.xml as follows.
- Replace
"Hello World!"with""in theandroid:text element - Add a new element,
android:textSize, and set it24sp
<TextView
android:id="@+id/sample_text"
android:layout_width="wrap_content"
android:layout_height="wrap_content"
android:textSize="24sp"
android:text=""
app:layout_constraintBottom_toBottomOf="parent"
app:layout_constraintEnd_toEndOf="parent"
app:layout_constraintStart_toStartOf="parent"
app:layout_constraintTop_toTopOf="parent" />
Add a database and a data file
The next task is to add an RaimaDB database and a text file that contains simple data to your project.
Add a "hello_world" database
Let's create a new database called "hello_world" and add it to your execution environment (emulator or physical device). The RaimaDB API in the native JNI module will interact with this database. We will use the following database definition.
CREATE TABLE info
(
    myChar CHAR (50 OCTETS) not null
);
Take the following steps to create the "hello_world" database and save it to your execution environment.
- Save the above definition into a text file. Name it "
hello_world.sdl" - Run the
rdm-createutility that comes with RaimaDB against hello_world.sdl as follows
rdm-create hello_world.sdl
- Create a directory called
docrootunder the "data/data/com.example.mynativeapplication/files" directory of your execution environment - Copy the database you've just created,
hello_world.rdm, into thedocrootdirectory - Run the
rdm-compilerdm-compile utility that comes with RaimaDB againsthello_world.sdlas follows. It generates a C/C++ header file,hello_world_structs.h, which will be added to your project later.
rdm-compile -s --lc-struct-members hello_world.sdl
Add a CSV file that contains data
The native JNI module you're adding will read text data from a CSV file and add it to the hello_world database. The file contains the following line.
Hello from Raima!
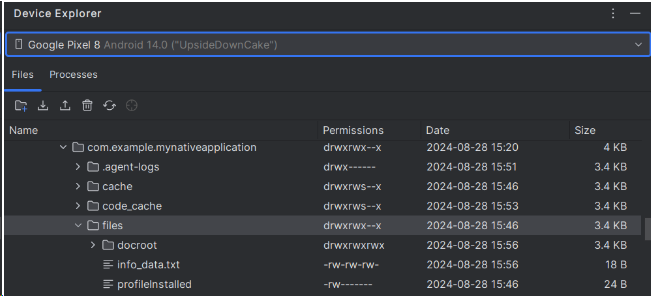
Save the above line as info_data.csv and save the file in the "data/data/com.example.mynativeapplication/files" directory.
Once the hello_world database and info_data.csv have been correctly placed, your "data/data/com.example.mynativeapplication/file" directory should look like this.
Add the RaimaDB API to the native JNI module
Now that we've got the groundwork laid, let's go ahead and add the RaimaDB API functions to the native JNI module in your project.
Add the RaimaDB API source and header files
First, add the following two files, rdmobj.cpp and rdmobj.h, to the app/cpp directory of your project. Those files contain a simple class that calls a series of RaimaDB functions to interact with the hello_world database.
rdmobj.cpp
/**
 * This file contains a C++ code example that demonstrates how to
 * open a database, insert data into it, retrieve the data from it,
 * and close it, using the RaimaDB's cursor API.
 */

#include "rdmobj.h"

// RDM header file generated for the database
#include "hello_world_structs.h"

#include <cstring>
#include <string>
#include <rdmapi.h>

/** \brief Initialize the TFS object
 *
 * @param docroot [in] Directory of the project's root directory
 * @return an RDM return code
 */
RDM_RETCODE RDMOBJ::init (const char *rootDir)
{
    RDM_RETCODE rc;

    rc = rdm_rdmAllocTFS (&m_tfs);
    if (rc == sOKAY)
    {
        if (rootDir != nullptr)
        {
            m_rootPath.assign (rootDir);
            std::string docroot {m_rootPath};
            docroot.append ("/docroot");

            rc = rdm_tfsSetOption (m_tfs, "docroot", docroot.c_str ());
        }
        if (rc == sOKAY)
        {
            rc = rdm_tfsInitialize (m_tfs);
        }
    }

    return rc;
}

/** \brief Open a database
 *
 * @param dbName [in] name of the database to open
 * @param openMode [in] database open mode
 * @return an RDM return code
 */
RDM_RETCODE RDMOBJ::openDb (const char *dbName, RDM_OPEN_MODE openMode)
{
    RDM_RETCODE rc;

    rc = rdm_tfsAllocDatabase (m_tfs, &m_db);
    if (rc == sOKAY)
    {
        rc = rdm_dbOpen (m_db, dbName, openMode);
    }

    return rc;
}

/** \brief Close the current database
 */
void RDMOBJ::closeDb ()
{
    if (m_db != nullptr)
    {
        (void) rdm_dbClose (m_db);
    }
}

/** \brief Read a string value from a file in the data directory
 * @param strValue [out] String value read from the text file
 * @return an RDM return code
 */
RDM_RETCODE RDMOBJ::readStringFromFile (std::string& strValue)
{
    RDM_RETCODE rc;
    std::string filePath {m_rootPath};
    filePath.append ("/info_data.txt");
    int dai;

    FILE *fp = fopen (filePath.c_str (), "r");
    if (fp == nullptr)
    {
        dai = errno;
        rc = eFILENOENTRY;
    }
    else
    {
        char info_data[51] {""};
        size_t bytesRead = fread (info_data, 1,  sizeof (info_data), fp);
        if (bytesRead == 0)
        {
            rc = eFILEIO;
        }
        else
        {
            strValue.assign (info_data);
            rc = sOKAY;
        }

        fclose (fp);
    }

    return rc;
}

/** \brief Insert a row into the INFO table
 *
 * @param strValue [in] String to insert
 * @return an RDM return code
 */
RDM_RETCODE RDMOBJ::putStringIntoDb (const char *strValue)
{
    RDM_RETCODE rc;
    RDM_TABLE_ID tableId {TABLE_INFO};

    rc = rdm_dbStartUpdate (m_db, &tableId, 1, nullptr, 0, nullptr);
    if (rc == sOKAY)
    {
        INFO info_rec;
        ::strcpy (info_rec.mychar, strValue);

        rc = rdm_dbInsertRow (m_db, tableId, &info_rec, sizeof (info_rec), nullptr);
        if (rc == sOKAY)
        {
            rc = rdm_dbEnd (m_db);
        }
        else
        {
            (void) rdm_dbEndRollback (m_db);
        }
    }

    return rc;
}

/** \brief Retrieve the first row of the INFO table
 *
 * @param strValue [out] the string value retrieved from the database
 * @return an RDM return code
 */
RDM_RETCODE RDMOBJ::getStringFromDb (std::string& strValue)
{
    RDM_RETCODE rc;
    RDM_TABLE_ID tableId {TABLE_INFO};

    rc = rdm_dbStartRead (m_db, &tableId, 1, nullptr);
    if (rc == sOKAY)
    {
        RDM_CURSOR cursor {nullptr};
        INFO info_rec {};

        rc = rdm_dbGetRows (m_db, tableId, &cursor);
        if (rc == sOKAY)
        {
            rc = rdm_cursorMoveToFirst (cursor);
            if (rc == sOKAY)
            {
                rc = rdm_cursorReadRow (cursor, &info_rec, sizeof (info_rec), nullptr);
                if (rc == sOKAY)
                {
                    strValue.assign (info_rec.mychar);
                }
            }
        }

        if (rc == sOKAY)
        {
            rc = rdm_dbEnd (m_db);
        }
        else
        {
            (void) rdm_dbEnd (m_db);
        }
    }

    return rc;
}
rdmobj.h
/**
 * This file contains a C++ code example that demonstrates how to
 * open a database, insert data into it, retrieve the data from it,
 * and close it, using the RaimaDB's cursor API.
 */
#ifndef MYNATIVEAPPLICATION_RDMOBJ_H_INCLUDED_
#define MYNATIVEAPPLICATION_RDMOBJ_H_INCLUDED_

#include "rdmapi.h"

#include <stddef.h>
#include <string>

class RDMOBJ
{
    RDM_TFS m_tfs;
    RDM_DB m_db;
    std::string m_rootPath;

public:
    RDMOBJ () : m_tfs {nullptr}, m_db {nullptr}, m_rootPath {""}
    {}

    ~RDMOBJ ()
    {
        if (m_db != nullptr)
        {
            (void) rdm_dbFree (m_db);
        }
        if (m_tfs != nullptr)
        {
            rdm_tfsFree (m_tfs);
        }
    }

    RDM_RETCODE init (const char *rootDir);
    RDM_RETCODE openDb (const char *dbName, RDM_OPEN_MODE openMode = RDM_OPEN_SHARED);
    void closeDb ();

    RDM_RETCODE readStringFromFile (std::string& strValue);
    RDM_RETCODE putStringIntoDb (const char *strValue);
    RDM_RETCODE getStringFromDb (std::string& strValue);
};

#endif //MYNATIVEAPPLICATION_RDMOBJ_H_INCLUDED_
Add the database header file
Likewise, add the database header file, hello_world_structs.h, which you generated earlier with the rdm-compile utility, to the app/cpp directory of your project. This file contains native structure definitions for the tables and keys defined in the hello_world database, as well as macros that represent tables, keys, columns and references. The RaimaDB API uses those elements to access the database.
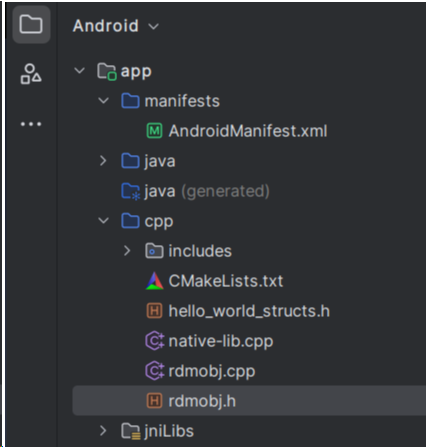
Once the RaimaDB API source files and the database header file have been properly added, your app/cpp directory should look like this.
Modify CMakeLists.txt
Next, modify your CMakeLists.txt to include the above source and header files as well as the necessary RaimaDB libraries. You can use the following CMakeLists.txt as a reference. Original comments have been stripped off for conciseness.
Note that the ANDROID_PROJECT_ROOT variable needs to point to your Android Studio project's root directory.
# Sets the minimum CMake version required for this project.
cmake_minimum_required (VERSION 3.22.1)

project ("mynativeapplication")

# Set the RaimaDB root path
set (RDM_ROOT "/opt/Raima/rdm_enterprise-16.0")

# Set the Android Studio project's root path to find the location
# of the RaimaDB libraries
set (ANDROID_STUDIO_ROOT "/home/dtoyama/AndroidStudioProjects/MyNativeApplication")
set (RDM_LIB_LOCATION "${ANDROID_STUDIO_ROOT}/app/src/main/jniLibs/${ANDROID_ABI}")

include_directories (
    "${RDM_ROOT}/include"
)
set (SOURCE_FILES
    native-lib.cpp
    rdmobj.cpp
    rdmobj.h
    hello_world_structs.h
)

add_library (${CMAKE_PROJECT_NAME} SHARED
    # List C/C++ source files with relative paths to this CMakeLists.txt.
    ${SOURCE_FILES}
)

add_library (rdm-librdm UNKNOWN IMPORTED)
set_target_properties (rdm-librdm PROPERTIES
    IMPORTED_LOCATION "${RDM_LIB_LOCATION}/librdmrdm.so"
)

add_library (rdm-libtfs_full UNKNOWN IMPORTED)
set_target_properties (rdm-libtfs_full PROPERTIES
    IMPORTED_LOCATION "${RDM_LIB_LOCATION}/librdmtfs_full.so"
)

add_library (rdm-libtx UNKNOWN IMPORTED)
set_target_properties (rdm-libtx PROPERTIES
    IMPORTED_LOCATION "${RDM_LIB_LOCATION}/librdmtx.so"
)

add_library (rdm-libs INTERFACE IMPORTED)
set_property (TARGET rdm-libs
  PROPERTY INTERFACE_LINK_LIBRARIES
    rdm-librdm
    rdm-libtfs_full
    rdm-libtx
)

Target_link_libraries (${CMAKE_PROJECT_NAME}
    # List libraries link to the target library
    android
    log
    rdm-libs
)
Modify the native JNI module source file to call the RaimaDB API
Finally, modify the project's existing native JNI module source file, native-lib.cpp, to call your RaimaDB API functions defined in rdmobj.cpp and rdmobj.h as follows.
#include "rdmobj.h"

#include <jni.h>
#include <string>

extern "C" JNIEXPORT jstring JNICALL Java_com_example_mynativeapplication_MainActivity_stringFromJNI (
    JNIEnv* env,
    jobject /* this */
)
{
    RDM_RETCODE rc;
    RDMOBJ rdm {};
    jstring jstrValue {nullptr};

    rc = rdm.init ("/data/data/com.example.mynativeapplication/files");
    if (rc == sOKAY)
    {
        rc = rdm.openDb ("hello_world");
        if (rc == sOKAY)
        {
            std::string strValue;
            rc = rdm.readStringFromFile (strValue);
            if (rc == sOKAY)
            {
                rc = rdm.putStringIntoDb (strValue.c_str ());
                if (rc == sOKAY)
                {
                    std::string strFromDb;
                    rc = rdm.getStringFromDb (strFromDb);
                    if (rc == sOKAY)
                    {
                        jstrValue = env->NewStringUTF (strFromDb.c_str ());
                    }
                }
            }
            rdm.closeDb ();
        }
    }

    return jstrValue;
}
Run the "Hello from Raima!" application
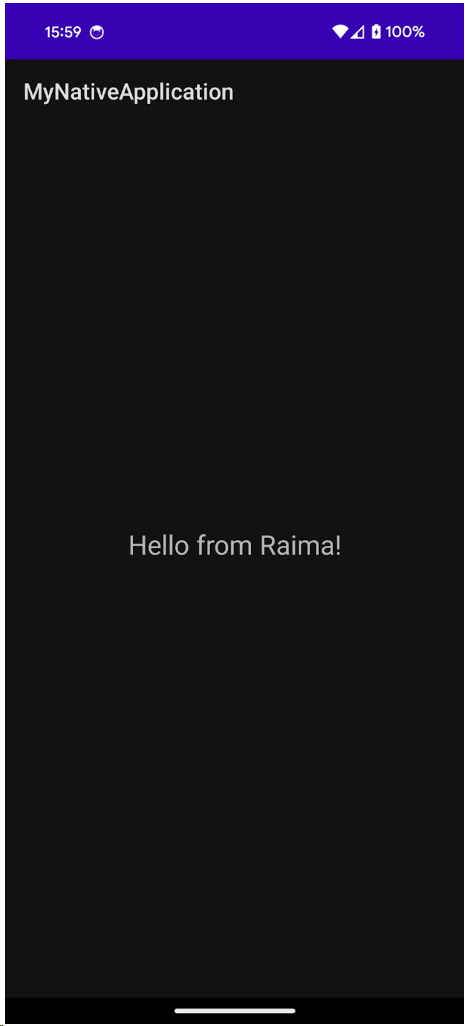
Now it's time to run the completed "Hello from Raima!" application. If it runs successfully, you should see the "Hello from Raima!" message in the middle of the application screen.
If your application screen remains blank, or if you run into any other issue, make sure you've checked off all the prerequisites and followed the steps outlined in this guide.