UNIX, Linux, or macOS Installation
This section covers the installation of RaimaDB for various UNIX platforms and cross compiled platforms using a UNIX, Linux or macOS development host. These instructions cover all object packages where UNIX, Linux or macOS is the development host. This also includes other cross compiled environments where the development host is UNIX, Linux or macOS.
Pre-Installation Requirements
- The disk space required for the RaimaDB development components is relatively small, less than 20MiB including tools, libraries and examples.
- The Enterprise package includes optional JAVA support for JAVA 8 or later. If you intend to use Java, it is recommended that the
jarexecutable be in the executable path prior to running the installer. If it is not, an additional step will need to be performed to instruct the Java RaimaDB library where to locate the associated JNI support libraries. See JNI Path.
The default directory for the installation will be a sub-directory of /opt/Raima. If the directory does not exist with sufficient read/write permissions, "sudo" can be used to perform the installation into this directory.
Introduction
This section covers the installation of RaimaDB for various UNIX platforms and cross compiled platforms using a UNIX development host. The installer is provided in the form of a compressed self-extracting archives. These instructions cover all object packages where UNIX is the development host. That includes UNIX, Linux, macOS, and other cross compiled environments where the development host is UNIX, Linux, or macOS.
After copying the installation file to the development host, make sure the execute permission is enabled for the install package (e.g., chmod +x rdm_enterprise-obj-lnx-x86_64-16.0.0.1664.run.sh).
The Install Dialog
To begin the install, execute the command from a terminal as follows:
$ ./rdm-<package>-obj-<target-host>-16.0.run.sh
Where package is the package type you have purchased and target-host is the target host. The target host will for cross compiled environments consist of a development host part and a target host part.
For example:
$ rdm_enterprise-obj-lnx-x86_64-16.0.0.1664.run.sh
$ rdm_core-obj-mac-arm_64-16.0.0.1664.run.sh
$ rdm_core-obj-lnx-x86_64--vxworks--16.0.0.1664.run.sh
The following sections describe the questions that will be asked by the installer script.
Installation Path
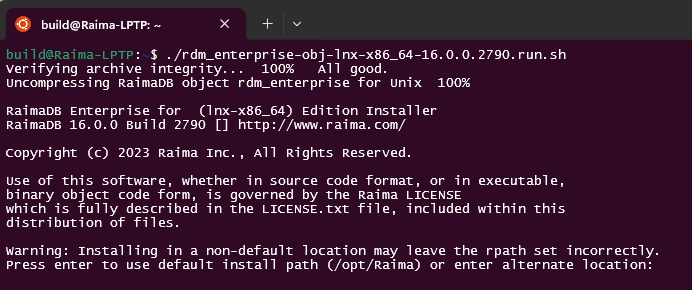
The default installation path for RaimaDB packages will be sub-directories of the /opt/Raima directory. The installation path provided can be an absolute path or a relative path.
The installer will create the directory rdm_<package>-16.0 within the directory specified. We recommend that you use the default (/opt/Raima/rdm-<package>-16.0/) because all binaries have the path to the libraries embedded into them.
Specifying a non-default installation path will leave these paths set incorrectly (rpath). Please refer to the XXXX section for instructions on how to complete the installation using an alternate installation path
View License


Next, you will have the option of viewing the license for RaimaDB. After the installation is complete, the license agreement can be found in the installation directory in LICENSE.txt.
Accept License and Install

Last, it will give you a summary and ask you to accept the license and install. Up to this point, no changes have been made to the file system. The installer process can be aborted or canceled by hitting CTRL-C. If you cancel the install none of the actual installer steps (described above) will be performed.
Common Errors Encountered During Installation
The following errors are common failures that have been experienced during the installer execution. Additional errors about running the "compile and run examples" option will be covered in the Getting Started Examples section.
Installer failed: Failed to create directory

If the user running the installer does not have permissions to create the chosen installation directory in the location selected, this error will occur. Run the installer again using SUDO or with a user that has sufficient permissions or select an alternate target directory for the installation.
Installer failed: Failed to remove symbolic link

If this version of the product has been previously installed in the selected target install directory and the user running the installer does not have permissions to overwrite the location selected, this error will occur. Run the installer again using SUDO or with a user that has sufficient permissions or select an alternate target directory for the installation.
WARNING: Failed to embed the jni path
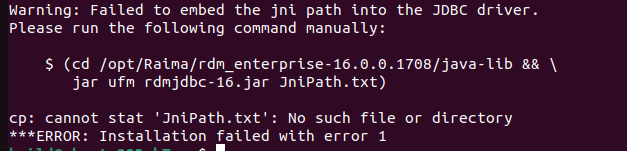
For installation packages supporting the Java JDBC interface, the installer will attempt to set the default path to the JNI library in the installation directory library. This setting requires the Java JDK version 8 or higher to be installed and in the system path prior to installation. See Getting Started Examples section for instructions regarding the examples after the correcting the missing component.
The installation is complete when this error is displayed except for the JNI path modification. A "readme" file is generated in the current working directory with the instructions needed to complete the JNI setup after the Java JDK is installed (README-JniPath.txt).
Uninstall
To uninstall, simply remove the installation directory:
$ rm -rf /opt/Raima/rdm-<package>-16.0/
If the "Create Symlinks" option was selected, those symlinks in the /usr/local/bin directory must be manually removed to uninstall.
Next Steps
Once the install process is complete, please get acquainted with building and running the examples included in the product to begin to familiarize yourself with the RaimaDB product. See the Getting Started Examples section.