Writing "Hello World!" for Android
This quick guide walks you through the steps to create and run a simple "Hello World!" application on Android using RaimaDB JDBC.
Prerequisites
It is assumed that you have done the following before adding the code for the "Hello World!" application.
- Create a new Android Studio project for the Empty Views Activity
- Add the RaimaDB JDBC Driver (
rdmjdbc.jar) to the project - Add the RaimaDB native libraries for the appropriate architecture to the project. For this guide, X86_64 will be used.
Modify the UI elements of the application
We need to do a few things to the application's UI elements before adding the RaimaDB JDBC methods to it.
Add necessary permissions
Let's start with a simple task. RaimaDB uses TCP sockets for network communication. It is true even when only local connections are used. For this reason, the following elements must be added to the project's AndroidManifest.xml.
<uses-permission android:name="android.permission.INTERNET">
</uses-permission>
<uses-permission android:name="android.permission.ACCESS_NETWORK_STATE">
</uses-permission>
Change the text of the TextView widget
The project displays "Hello World!" on the main screen by default. We will remove the initial text so the widget will initially display nothing. The "Hello World!" text will be retrieved from an RaimaDB database instead.
Replace "Hello World!" with "" and add an ID to the TextView widget in your project's activity_main.xml as follows. The ID will be used later to set the text from the application later.
   <TextView
        android:id="@+id/main_text"
        android:layout_width="wrap_content"
        android:layout_height="wrap_content"
        android:text=""
        app:layout_constraintBottom_toBottomOf="parent"
        app:layout_constraintEnd_toEndOf="parent"
        app:layout_constraintStart_toStartOf="parent"
        app:layout_constraintTop_toTopOf="parent" />
Add a button widget
We will now add a new button widget to the "Hello World!" application. The button will be used to call the JDBC methods to access the RaimaDB database.
First, add a new button widget to the project's activity_main.xml. The button will appear above the text.Add a button widget
We will now add a new button widget to the "Hello World!" application. The button will be used to call the JDBC methods to access the RaimaDB database.
First, add a new button widget to the project's activity_main.xml. The button will appear above the text.
   <Button
        android:id="@+id/button"
        android:layout_width="wrap_content"
        android:layout_height="wrap_content"
        android:text="Connect"
        app:layout_constraintBottom_toBottomOf="parent"
        app:layout_constraintEnd_toEndOf="parent"
        app:layout_constraintStart_toStartOf="parent"
        app:layout_constraintTop_toTopOf="parent"
        app:layout_constraintVertical_bias="0.286" />
Add an onClick () method
Next, we will add an onClick() method to MainActivity.java that will be invoked when the button is pressed. In order for the onClick() method to work, the MainActivity class needs to implement View.OnClickListener. The code to link the button widget to the onClick() method is also added to the MainActivity class.
// Additional imports
import android.view.View;
import android.widget.Button;
import android.widget.TextView;

public class MainActivity extends AppCompatActivity implements View.OnClickListener
{
    @Override
    protected void onCreate(Bundle savedInstanceState)
    {
        super.onCreate(savedInstanceState);
        EdgeToEdge.enable(this);
        setContentView(R.layout.activity_main);
        ViewCompat.setOnApplyWindowInsetsListener(findViewById(R.id.main), (v, insets) -> {
            Insets systemBars = insets.getInsets(WindowInsetsCompat.Type.systemBars());
            v.setPadding(systemBars.left, systemBars.top, systemBars.right, systemBars.bottom);
            return insets;
        });

        Button myButton = findViewById (R.id.button);
        myButton.setOnClickListener (this);
    }

    @Override
    public void onClick (View view)
    {
        if (view.getId () == R.id.button)
        {
            TextView myTextView = findViewById (R.id.main_text);
            String str = "Testing...";

            myTextView.setText (str);
        }
    }
}
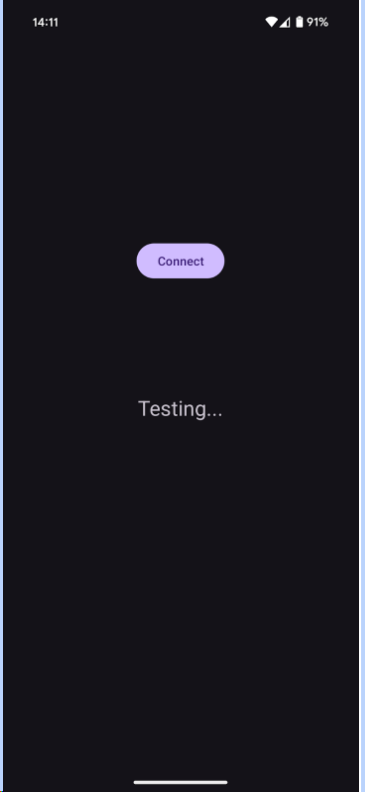
You can try running the application at this point to make sure it builds and runs successfully. Press the "Connect" button to see "Testing..." appear in the middle of the application.
Add the hello_world database
Next, create a new database called "hello_world" and add it to your execution environment (emulator or physical device). The "hello_world" application will interact with this database. We will use the following database definition.
CREATE TABLE info
(
    myChar CHAR (50 OCTETS) not null
);
Take the following steps to create the "hello_world" database and save it to your execution environment.
Save the above definition into a text file named "hello_world.sdl".
Run the rdm-create utility that comes with RaimaDB against hello_world.sdl as follows
rdm-create hello_world.sdl
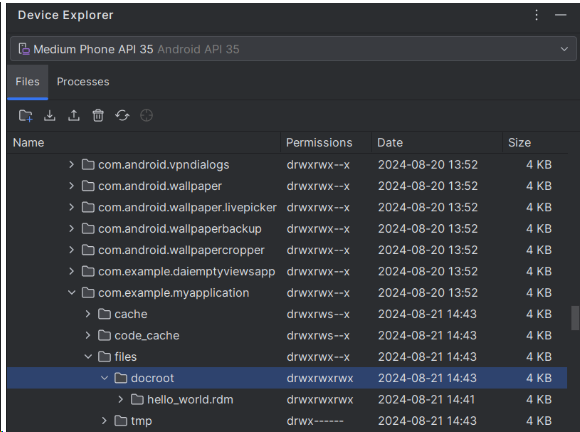
Create a folder called docroot under the "data/data/com.example.myapplication/files" folder of your environment. Copy the database directory ("hello_world.rdm") into the newly created docroot folder.
Add the RaimaDB JDBC methods
Now that we've got the groundwork laid, let's go ahead and add the RaimaDB JDBC methods to the onClick() method.
Add the SQL imports
The RaimaDB JDBC Driver implements the interfaces defined in the "java.sql" package. As such, they need to be imported into your project. Add the following line to MainActivity.java.
import java.sql.*;
Add the RaimaDB JDBC methods
Add the following JDBC methods to MainActivity.java, right above the onClick() method.
/** Insert a row into the INFO table
 *
 * @param conn [in] JDBC connection object
 * @throws SQLException if an error occurs in the RaimaDB libraries
 */
private void insert_row (Connection conn) throws SQLException
{
    Statement stmt = conn.createStatement ();
    stmt.executeUpdate ("INSERT INTO info VALUES ('Hello World!')");
    conn.commit ();
    stmt.close ();
}

/** Retrieve the first row of the INFO table and display it
 *
 * @param conn [in] JDBC connection object
 * @return the string value retrieved from the database
 * @throws SQLException if an error occurs in the RaimaDB libraries
 */
private String retrieve_row (Connection conn) throws SQLException
{
    Statement stmt = conn.createStatement ();
    ResultSet rs = stmt.executeQuery ("SELECT * FROM info");
    String val = null;
    if (rs.next ())
    {
        val = rs.getString (1);
    }

    return val;
}

/** Run the hello world example
 *
 * @return the string value retrieved from the database
 * @throws SQLException if an error occurs in the RaimaDB libraries
 */
private String run_hello_world () throws SQLException
{
    String myAppName = "com.example.myapplication";
    Connection conn = DriverManager.getConnection ("jdbc:raima:rdm://local/hello_world?appname=" + myAppName);

    insert_row (conn);
    String val = retrieve_row (conn);

    conn.close ();
    return val;
}
Call the run_hello_world () method
Finally, add a call to the run_hello_world() method to onClick(). The run_hello_world() method inserts a new row into the database and retrieves the inserted value, which is the text containing "Hello World!"
@Override
public void onClick (View view)
{
    if (view.getId() == R.id.button)
    {
        TextView myTextView = findViewById (R.id.main_text);
        String str = null;

        try
        {
            str = run_hello_world ();
        }
        catch (SQLException ex)
        {
            str = ex.toString ();
        }
        finally
        {
            if (str != null)
            {
                myTextView.setText (str);
            }
        }
    }
}
Run the "Hello World!" application
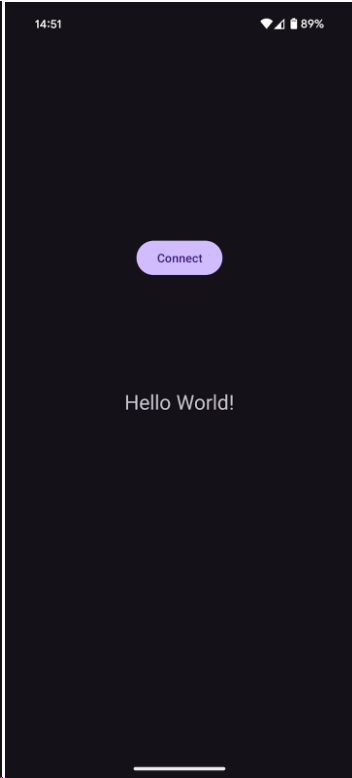
Now let's run the completed "Hello World!" application. If it runs successfully, you should see the "Hello World!" message in the middle of the application upon tapping the "Connect" button, as follows.
If you get an SQL exception error displayed instead, or run into any other errors, make sure you've checked off all the prerequisites and followed the steps outlined in this guide.