Getting Started with JDBC
Using the JDBC API requires a little bit of set up before you can get your application to compile and run correctly. If you follow the steps below, you will be able to execute your application correctly in both the command line and Eclipse GUI interfaces.
Command Line
- Set your environment variables to the correct value. The variables you will need to set are:
- CLASSPATH: Set to the current directory of the
rdmjdbc-14.jarfile along with your current working directory (i.e., /opt/Raima/rdm-14.1/bin/rdmjdbc-14.jar:.) - JAVA_HOME: Set to the current directory where your jdk is installed (i.e.,
/opt/java/jdk)
- CLASSPATH: Set to the current directory of the
- Create your JDBC application. Look at Basic JDBC Application Steps for more information on this topic.
- Compile your main class .java file you have created above by using
javac"entry point .java file" (i.e.,javac HelloWorld_JDBCTutorial_main.java) - If your CLASSPATH and other environment variables are set up correctly, you should be able to launch your application using the java command on the entry point to your program. This is the name of your main class (i.e.,
java HelloWorld_JDBCTutorial_main) If using JNI make sure that thejdbcjnidynamic library is added into yourjava.library.path. This can be done several ways, one of which would be by typing "java -Djava.library.path={path to"rdmjdbcjni-14} HelloWorld_JDBCTutorial_main
Eclipse GUI
-
Step 1: Create a workspace inside of your Eclipse IDE. Enter the workbench by clicking the image below
-
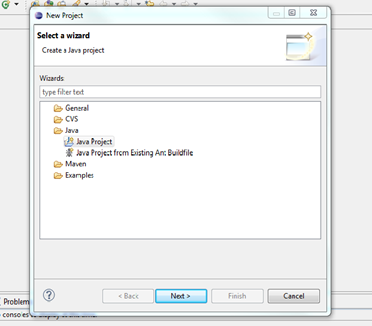
Create a new project by going to File->New->Project. You will see a menu for a New Project Wizard, which looks like the corresponding image.
- Click Next on the New Java Project Wizard box. From there you will need to enter a few parameters. First of which being your Project Name. This can be whatever you would like. Next make sure to use execution environment JRE: JavaSE-1.6 as that is what RDM supports. Again, click Next.
- This next screen is important, as it will contain any source code or libraries that you will need to import. Along with specific steps you will need to follow for using each communication protocol.
- First of all, from the source tab you can click link additional source to your Eclipse workspace to import any source that you have made previously that you would like to be included in this project. If you are using TCP/IP skip step 4f, if using Direct Link skip step 4e.
- Now click on the Libraries tab. Here is where you will link the RDM JDBC/JNI library. The next image shows this tab including
rdmjdbc-14.jarwhich is the file you will include.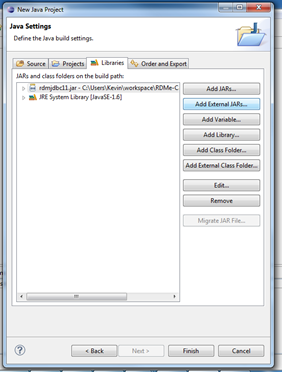
- Click "Add External Jars". From here, navigate to where your
rdmjdbc-14.jaris located. - Click Finish.
- If using TCP/IP now is a good time to make sure your rdmsqlserver is running.
- If Using Direct Link through JNI, you must include the
rdmjdbcjni-14shared library file by expanding therdmjdbc-14.jarfile that you just including and add it to your native library path
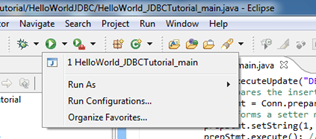
- From here you will need to create a run configuration for your program. This is assuming you have either included enough source to execute or you have written code in your project that has compiled correctly. Click the down arrow on the green "run" button directly above the drop down menu's left edge, which is shown in the image below.
- Click Run Configurations
- You may have to set up a new run configuration. Simply select new Java Application on the next screen.
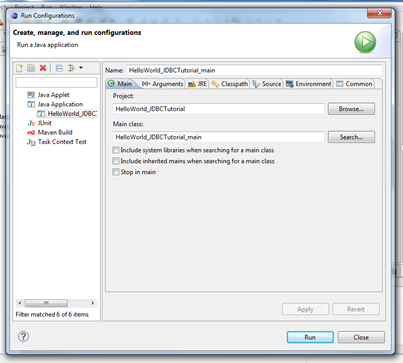
- Make sure that in the "Project" field, your current project is shown, and in the "Main Class" field, the class containing the main entry point is shown. It should look similar to the image below. Once you have verified everything is correct and you are ready to run your application, click "Run".
- Click Run Configurations